
5 Tips for Guiding Students Through PHET and other Simulator Tools
If you’re a science teacher you know that there are simply some concepts that cannot be shared or visualized by students without the support of a simulation. Fortunately, there are MANY available simulator tools (some FREE and some subscription based) that can support your instructional efforts. <For an exploration of OTHER simulation tools, see this previous post on digital simulations> For me, my go to simulator tools are located on PHET. PHET stands for Physics Education Technology as the concept for these simulator tools was originally developed in 2002 as a project at the University of Boulder in Colorado to improve the way science is taught and learned.
The primary reason I like using PHET simulator tools is the fact that it is free, but secondary to that is the fact that it provides easy access, supports explaining concepts simply, no log-in is required, the simulator tools are well thought out and are they are easy to manipulate.

If you’ve never explored PHET, here’s a link to their catalog of simulator tools. It can be filtered by content area and grade level, When my students are working with a Phet simulation, I like to provide a digital guide sheet for students to reference as they work their way through the simulation. These guide sheets contain directions, opportunities for reflection and comprehension questions. The tips below, are based on the use of a digital resources, however, they can also be implemented on a printable worksheet in conjunction with a LMS (Learning Management System).
Here are 5 tips for guiding students through PHET and other simulator tools:
1. Provide Visual Directions
When developing guide sheets for student, actively snip sections of the simulation and embed them into the digital worksheet. I find that it truly helps guide students towards activating the correct settings in a simulation before they engage. These tiny images provide students with a visual support, rather than simply using text, when guiding them through the simulation task and are especially helpful for students requiring additional support. Here’s an couple of examples:
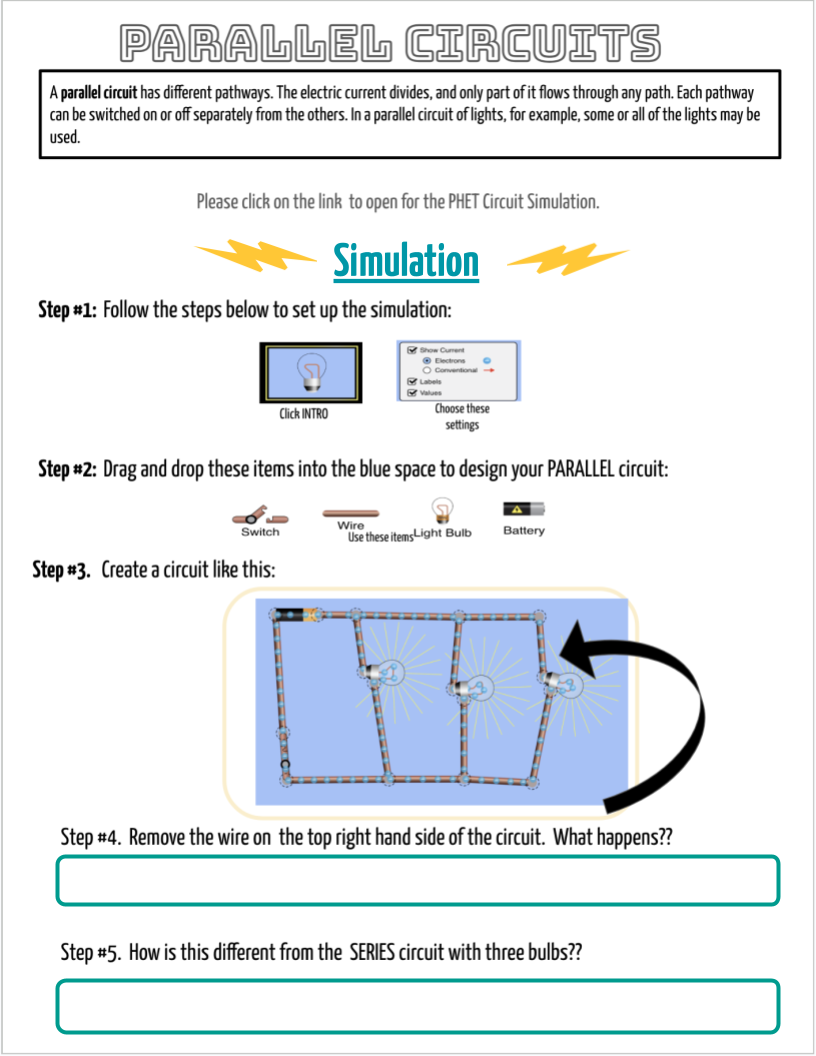

This strategy is also extremely effective when you need students to create something, specifically like the circuit they need to design in the case above, and they need a model or guide of what you’re expecting them to create. If you haven’t discovered the remove.bg website, it does a great job of quickly and easily removing any background color to make the images look even BETTER on your page.
2. Encourage Note and Notice Opportunities
Encourage students to record what they note and notice (or notice and wonder) as they interact with the simulation to support more exploration and discovery rather than a recipe of directions. I usually give students a specific number of elements to notice as it’s sometimes difficult to get them to record a large quantity of discoveries. Enumerating the requirements forces students to play with the simulation in greater depth and in the end facilitates more discovery.
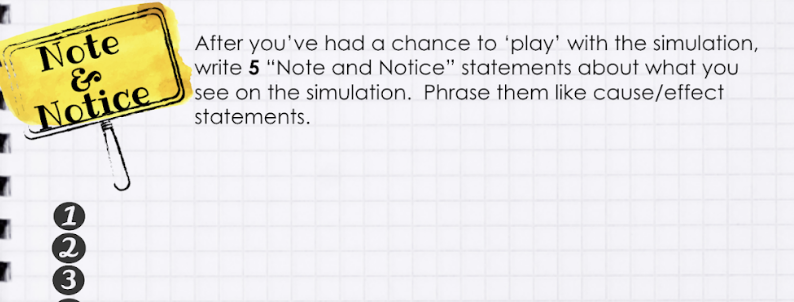
One way to support the NGSS Cross Cutting concepts is to provide students with a specific directive about their note and notice statements. I will often have them write using an IF/THEN format (to support cause/effect) so that I can see that they were writing about their discoveries within the simulation and not just commenting on formatting or on aspects of the simulation not related to the learning objectives.
3. Have Students Snip and Share
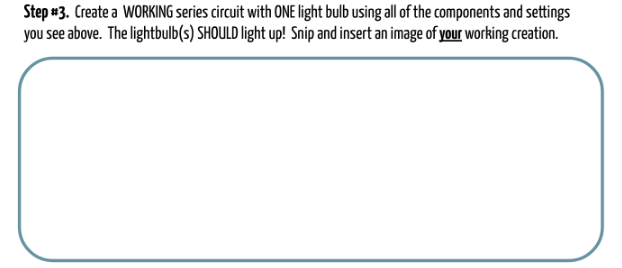
Have students use the snipping tool to snip and share their explorations, designs and discoveries with you. This is a great way to assess students’ learning experiences. In many of the simulations there are opportunities for students to create/connect items. I usually allow space on my digital worksheets for students to insert their ‘snippped’ creations.
4. Provide a Screencast
Screencast and record a short video snippet of how to set up the simulation and share a link to that screencast on the student guide sheet. This can be a brief, non-narrated scene demonstrating where students need to click or what they need to drag and drop, etc. There are many FREE screen casting tools available such as Screencastify. This strategy is great for providing directions to students with special needs and/or students that are not present for in class instructions.
5. Insert Direct Links
Include a direct link to the simulation on the guide sheet that you provide to students or provide direct links to supplemental information that students might need to make their learning experience more successful. This can include definitions, concepts, small explanatory videos, etc.
Undoubtedly, PHET simulations allow educators a way to introduce and reinforce skills that might be otherwise unapproachable. With these tips you’ll be better able to support independent student use and more exploration rather than running around restating directions and explaining expectations and that, of course, is ✨Using Your Smarticles✨
FREE ✨Smarticles!✨
Connect with ✨Your Smarticles✨ to get our latest content by email.